Ka’ak-Ib-Loz

When I married a Sephardic Jew there were lots of new traditions to get used to – even the engagement party pastries were new and exotic. Instead of the usual heart shaped cookies with our names embossed them I was enchanted to see these sweet little wreaths – Ka’ak-Ib-Loz decorating the tables. Made out of almond and pistachio marzipan they stole the show. For the Love of Cooking was gifted to me a few years later by our grandmother and I decided to try my hand at making them.

As Passover approaches I’m happy to note these cookies are in fact Kosher for Passover. However if you have pistachio allergy in the home like I do – stick to just making the rings with almonds.

Ingredients:

almonds, pistachio nuts, confectioners sugar, orange water, green food coloring

The Process:

The most difficult part of this process is the first part. You have to blanch the nuts (instructions not provided in the cookbook) and then shell them – peeling off all the little brown outside bits from the almonds. This cannot be done if you haven’t blanched the almonds for long enough. Then you grind the nuts in a food processor. At the time I did not have a large food processor, only a small table top one. Then I pulsed in the sugar.

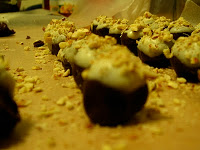
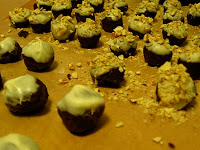
As my pistachios did not have a deep green color after blending I went ahead and mixed the orange water and food coloring in with the nuts. You can skip the food coloring if your pistachios were more vivid than mine. I then tried to shape the mixture into balls and join the ends to make a ring. This was pretty difficult. The mixture was a little crumbly and I felt I needed more liquid of some sort to make it pliable. At this point you can crimp the edges to make them more wreath like before leaving them out to dry. I tried to twist several strands together as well but that didn’t quite pan out given the dry/brittle nature of the dough.

The Results:

The taste was great, but the shapes were not as pretty as I liked. I think if I had a finer grind on the nuts and a little more water I could have done fun things like make different colors and shapes. 


Sweet Potato Fries

Ever wish you could have more nutrition in the fries you feed your kids? I do. Which is why I love sweet potato fries, especially when they are baked like the ones in this recipe from Fresh & Easy.

Raw Sweet Potatoes

Ingredients:

sweet potatoes, oil, sugar, salt, parsley flakes

The Process:

Preheat oven to 450 F. Then I cut the sweet potato fries into strips (if you would like to avoid orange hands, wear gloves). Spread potatoes on a silicone mat, coat with oil and spread into a single layer.  Bake for half an hour until lightly browned and toss potatoes in spice mixture.

The Results:

These are delicious! Did not last over an hour. My kids swoop in and grab them straight from the oven every time I have made these fries. Quick, easy and highly recommended. however you cannot skip the baking mats – without them the fries will stick to the baking sheet and become mushy. Added bonus: these are kosher for passover!

Spicy Sweet Potatoes


Hasselback Potatoes

Potatoes are a staple in many households. They are available in winter and summer, inexpensive and filling. They are also a little plain looking, and groans of “potatoes again” can be heard when I put the same dish of cubed, baked potatoes on the table again. This recipe, from Kosher by Design Entertains, gave me a way to dress up potatoes for special events and did not seem overly difficult not did it involve too many strange ingredients.

Ingredients:

Idaho or Yukon Potatoes (I used Idaho), garlic, sea salt, black pepper

Slicing the Hasselback Potatoes

Slicing the Hasselback Potatoes

The Process:

I preheated my oven to 450 and set up a chopping block with scrubbed potatoes. Then I sliced each potato into thin wedges, without slicing all the way through. It took some practice to avoid slicing all the way down without wimping out and not slicing through enough. Then I placed the potatoes on a baking sheet, placed garlic in between the slivers and drizzled the potatoes with olive oil, salt and pepper.

The potatoes baked for one hour, with continuous basting. Then they were ready to eat!

The Results:

Hasselback Potatoes Ready for the Oven

Hasselback Potatoes Ready for the Oven

There definitely no strange ingredients which is a plus in my book. After some practice, slicing the potatoes was easy and drizzling them with garlic and oil took all of two minutes. The major hardship here was basting the potatoes and making sure the oven did not burn. This helps them stay moist and prevents burning.

They were a huge hit at the table and disappeared in minutes! I would definitely make it again.


Hasselback Potatoes Ready for the Oven

Overnight Potato Kugel

Prepare yourself for a shocking admission: I do not like potato kugel. Never have, probably never will. Yes, I am indeed Jewish. I come from a large family of potato kugel lovers. My mother even sends over potato kugels for my husband because I so rarely make them. I like other kugels but I just don’t get the appeal of potato kugel. With one rare exception. Occasionally at a Kiddush the caterer will bring out a greasy tray of delicious potato kugel. You know the type: the bottom is slightly darker, because all the eggs have sunk and it is clear that oil is a featured ingredient. For some reason THOSE potato kugels have sometimes appealed to me when the homemade, hand grated, gourmet potato kugels have not. It’s a guilty pleasure. We all have them. At least mine won’t kill anybody – well, not unless you count coronary artery disease.

When I saw the recipe for “overnight potato kugel” in Fresh & Easy by Leah Schapira I thought “Hey! maybe that’s the secret to those kiddush kugels. They sit around in a warmer all night. Why else would someone make a recipe for kugel that cooks all night, yet is not being made in a crock-pot and requires two hours of cooking before the long oven step?”. It must be to replicate that delicious kugel taste. So I decided to give it a try.

Ingredients:

potatoes, onion, eggs, water, oil, salt, pepper

The Process:

This is a simple recipe. You start by grating the potatoes and onion. You can use a food processor (Schapira recommends a Braun and even explains which blade to use) but I hate taking that thing out and cleaning it, so I hand grated my potatoes. Its not too difficult and reminds me of when I used to do this for my mother. Then you mix in the eggs, boiling water and spices. Everything gets poured into a pan and baked for two hours.

silver foil wrapping

After two hours you remove the kugel from the oven and tightly wrap it three times with foil. As you can see from the photo, I made sure that puppy was sealed tight! The oven temperature is turned down and you replace the kugel into the oven with a pan of cold water placed on the rack below it. At this point the kugel sits for either 8 hours of overnight, so I went to bed. When I woke up in the morning the entire house smelled of potato kugel. Be warned your entire family will start craving kugel even if it is 6am! They can’t help it, the house has smelled like kugel the entire night.

The Results:

The recipe makes a huge amount of kugel, a 9 x 13 inch pan full. The kugel has a slightly darker color than usual, and this is accurately depicted in the photo in the cookbook. It smelled awesome, but unfortunately it tasted like… nothing. It was bland and was not at all what I was hoping for. To make sure it wasn’t just my dislike of potato kugel I served it to potato kugel lovers in the family. They agreed that this was nothing special and wondere

d what the whole point of leaving it overnight was, as it did not improve the kugel at all. Its best feature was the delicious aroma.In the end, I would recommend adding more spices or serving this kugel with a dip like applesauce to make it more exciting. I won’t be making it again. My quest for kugel that tastes like the one at shul kiddush tables continues.

overnight potato kugel

Holiday Truffles

I all ready knew how this recipe was going to turn out because my husband and I made these truffles together the first year we got married. We’ve made them again every year. They are easy, inexpensive and delicious. A win from Gifts from the Country Kitchen!

Ingredients:IMG_0854

3 packages (12 oz each) semisweet chocolate chips, 2 1/4 cups condensed milk, 1/2 tsp each orange, peppermint and almond extract, 1 1/2 lb white candy coating, 3/4 lb dark candy coating melted, 1/2 cup ground almonds

The Process:

The trickiest part about making truffles is melting the chocolate. When the recipe tells you to microwave in short busts, it means it! Heating for longer can lead to burnt chocolate. This occurred when a certain person who shall remain nameless, but is married to me, thought that one full minute was better than short bursts of 15 seconds. Heating slowly, and stirring, allows the chocolate to melt properly. Since this is semi-sweet chocolate you don’t have to be as worried as you would be while working with milk chocolate, but it’s still difficult. Double boilers are also great for melting chocolate but are more of a hassle so I save them for milk chocolate.

Once we had a working batch of melted chocolate we mixed in the condensed milk and then chose the extracts we wanted. We made a batch of mint, and a batch of almond. This then goes into the fridge to chill. Unfortunately it still comes out a bit gooey and molding it into balls can be a little messy. Return  the formed balls to the fridge so they firm up more  and can be easily handled. Then you dip them into the melted candy melts and apply decorative toppings (crushed almond for the almond extract for example). While the recipe calls for a half hour in the fridge, they are still a sticky at that point and thus dipping was a little difficult. We also had some trouble getting the ball immersed so the bottoms of many of our truffles were not dipped.

After a final chilling step these were ready to eat.

The Results

Everyone that we served these truffles to said they tasted great. In fact we gave them to others as part of mishloach manot one year and gotphone calls about how unique and delicious the homemade truffles were. However my results are never as perfect as those pictured. They balls are a little less round or imperfectly dipped. I also suggest longer chilling times – wait until the balls are not sticky to handle them.

IMG_0855